Sunday, September 16, 2012

OWLS AT MONCHES FARM

I went out to Monches Farm yesterday with a friend, and I took so many pictures that I'm going to split them into two posts.  

First, the owls.  

Not real owls, but plenty of owls for autumn and Halloween decorating!


Tomorrow . . . 

everything else!!!

If you live in SE Wisconsin, and you've never been to Monches Farm, it is well worth the trip.  They have many special events throughout the year.  You can see what they have to offer here.


Saturday, September 15, 2012

CHOCOLATE ACORNS

This is a fun treat to make and delicious to eat.  I saw it on Pinterest and decided to give it a try.  They're easy to make, so if you have little ones, let them help!  I have a feeling that many of these little gems won't make it to the serving plate.  

They're made with Hershey Kisses, melted and non-melted chocolate chips, and Market Pantry Mini S'Mores Sandwich Crackers from Target.

Just melt about 1/4 cup of chocolate chips to use for your "glue", and start assembling

kiss + "glue" + sandwich cracker + "glue" + chocolate chip = candy acorn


It was the perfect one-bite sized treat that everyone enjoyed.


Friday, September 14, 2012

A SIMPLE LITTLE PICKLE JAR

Vases.

The expensive little shops and boutiques are full of them.

And they're very pretty.

But I prefer a simple little pickle jar for my garden bouquets. 

 Add a label that you can download from the Graphics Fairy and it becomes something special.  I like to print the label on heavy tan colored cardstock, cut it out, scrunch it up (even tear it a bit here and there), then iron it (yes, iron it), and put a little Mod-Podge on the back (not on the front), and adhere it to the side of the jar.  

Tie it all up with a piece of cooking twine (you can find it at the grocery store), and you have a unique, and inexpensive little jar that is perfect for those end of summer bouquets!  And . . .  maybe someone will even think you found this "antique-jar-with-the-original-label-still-attached" at a charming shop in a quaint little town in the countryside!


It's perfect for giving to all your flower-loving friends too!  You should surprise someone with a special little homemade "vase" and bouquet today. 

That's what I'm going to do.


Thursday, September 13, 2012

THERE'S A NEW SHOP ON ETSY!


Today I'm excited to introduce you to a new shop on Etsy.    The shop, called "Emetsigns", is owned by Sarah who lives in Colorado Springs.
Sarah is the daughter of my friend Jan, from McKinney, Texas .  (If you've followed my blog for awhile you've seen several posts on Jan's historic home in McKinney.)  When Jan told me about Sarah's new business venture, I had to take a look at Emetsigns and learn more about it.
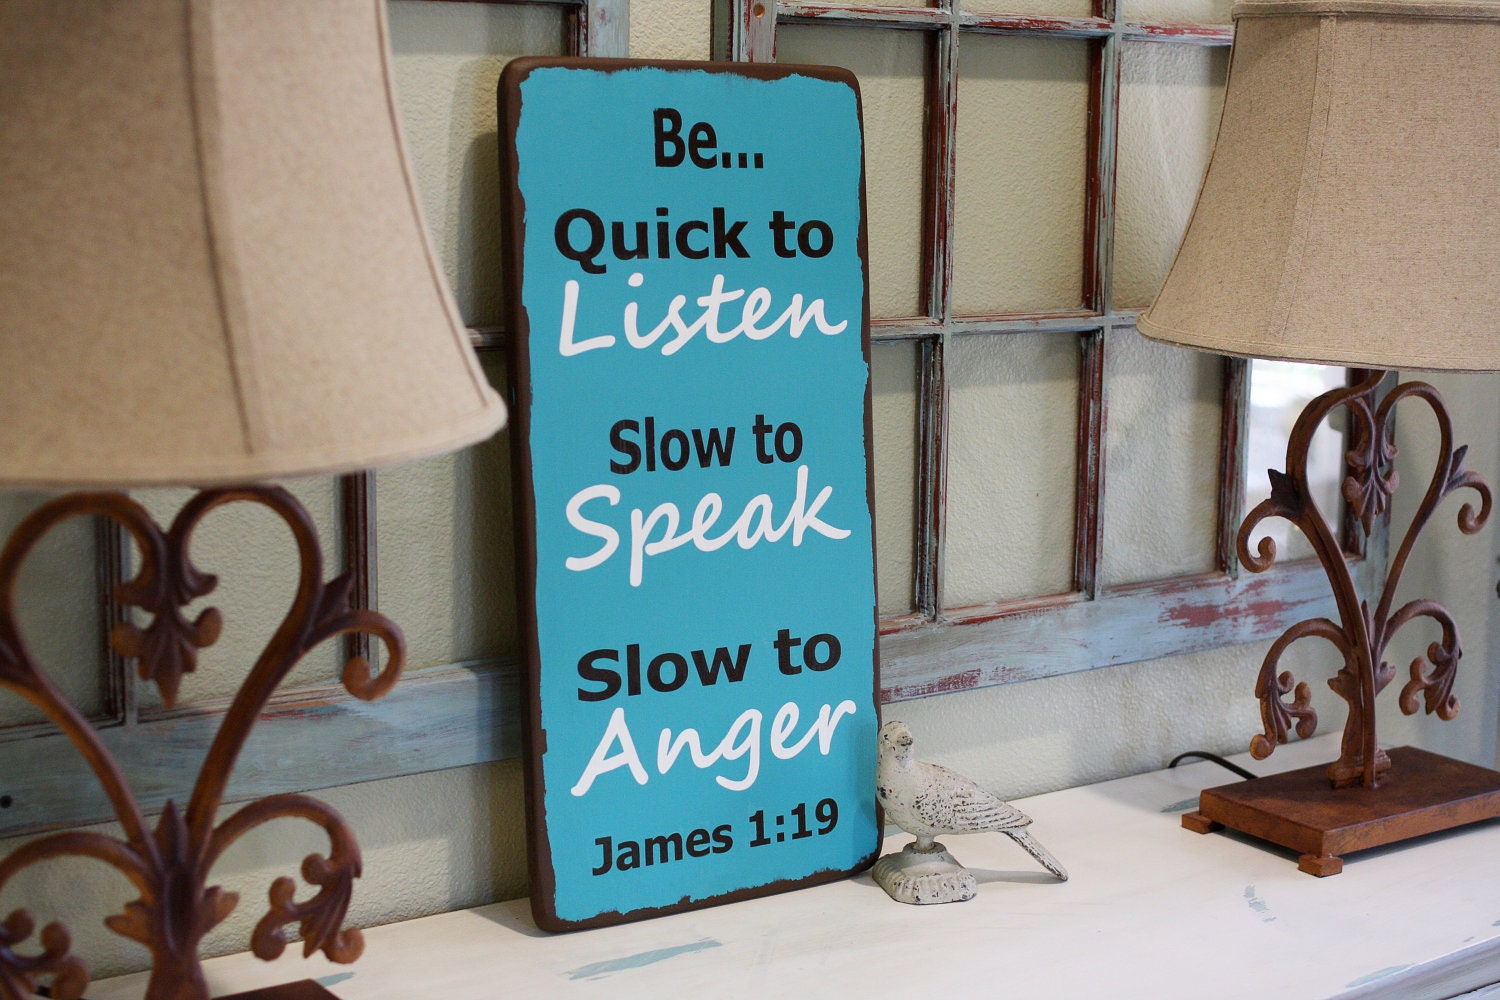
Wow, such beautiful work!  Sarah's signs feature inspiring Scripture she hand paints on hardwood.  Here's a sampling of what you'll find there:
James 1:19

Major W. David Gray Sign
The above sign holds very special meaning for Sarah and her family.  It was made in honor of a friend they lost recently in the war in Afghanistan and $10 from each sale of this sign will be donated to the Wounded Warrior Project.
Wouldn't this sign be beautiful in a child's bedroom?  You can pick from a wide array of colors that would work in either a boy's or girl's room - a perfect gift for a newborn or child's birthday.
Leaving The House Sign
This is a sign she designed for above the doorframe of your house.  As Sarah says, 

"I wanted this up in our house over the door that we leave the house from every day. I needed the reminder that God is bigger than WHATEVER I am walking out the door to. I don't think I am alone.... Don't most of us need the reminder that God is bigger than the hard stuff we face down here???? Praise God that He is!!!"

Sarah has spent a lot of time developing and perfecting her technique for these unique subway signs.  I hope you'll click over and visit her new Etsy shop, 


Emetsigns! 

Take a look at all of the beautiful and meaningful work she's doing.


Wednesday, September 12, 2012

A FELTED BIRD AND ROSE PILLOW

A blue and cream felted bird and rose pillow - that's what will be going in the mail tomorrow.

This one was also purchased in my Etsy shop, Gillyflower Cottage, and will soon be on its way to northern Wisconsin.

So much fun to make with lots of tendrils, leaves, and roses in two tones of blue - the smaller "buds" were done in a darker blue.


Wednesday, September 5, 2012

PILLOWS LEAVE GILLYFLOWER COTTAGE

A while back I made a Burlap Subway Sign Lumbar Pillow for a friend who had just moved into Wauwatosa.  I also put a similar pillow into my Etsy shop, Gillyflower Cottage.  

It's a "Name Your City/Cottage/Lake/Family Name" pillow.  Anything goes, really.  You can read more about it here.
So here are two that were just ordered - one with a family name and one with a city name.  
They were so fun to make!  
1.  Just sew a narrow strip of fabric (I chose a striped brown linen) to a wider strip of burlap for the front of the pillow.  I have three shades of burlap to choose from on Etsy - Natural, Idaho Potato, and Oyster.  the fabric strip sewn to the burlap varies to go with the burlap color chosen.

2.  Then center your word(s) and stencil away using fabric paint and a stencil brush.
 I like to do a practice run on newspaper first so I'm sure to have it centered.  Then line it up with your pillow top and duplicate it on the fabric.  Don't forget to use a strip of masking/painters tape to keep your lettering even as you go across the pillow.
3.  Once you've stenciled the front, cut another piece of burlap the same size as the front.  Put right sides together and sew them together.  Since burlap likes to ravel, I also do a row of zigzag stitch around that to hold it all together nice and tight.  Don't forget to leave about a 10" opening for stuffing the pillow.  My pillows are custom sized so they don't fit standard pillow forms.  I fill them myself with loose acrylic fiberfill.  Just little bits at a time gives you a much more even filling.
4.  Then sew the opening closed, and use a thread of your choosing to do a whipstitch around the edge of the pillow.  The whipstitch is not necessary but gives a nice finishing touch to the pillow.  The size I list is 12" x 28" but these pillows were adjusted at the customers request to fit the name and spot where it will sit.
 Cool name for a city, isn't it?  Jamaica Plain!
 I do my hand whipstitching in a strand of jute to match the pillow.
And they're ready to go!

One more thing! 

I have two exciting posts coming up!  

One will feature a friend's brand new etsy shop - she has beautiful Subway Signs for the home. 

The other will be a giveaway for a $50 gift card to a great little place that features clothing, jewelry, and home items.  

More on both of those soon . . .

Thanks for stopping by!


Friday, August 17, 2012

ANTHROPOLOGIE-LIKE VASE


Today I have just a quick little tutorial on making one of these Anthropologie-like flower vases. 
They also sell cute little jars with the flowers on the top.
There are a lot of directions you could go with this project.  I still want to try to make a flower out of air dry clay and then try painting the flowers more like the ones on the jars and vase above.  But today, I'm just showing the most simple flower you can make.

BE PATIENT AND BE PREPARED!  

The flower looks really, really ugly until you get it painted!  

First, get everything you need all lined up:  taper candle, scissors or tongs, plastic spoons, and matches or a lighter, and a hot glue gun, E6000 glue, or some other quick-drying strong glue.  It would also be good to have the vase you'll be attaching it to all ready and waiting.
Now you're ready to made each petal of the flower.  Hold a spoon, dome side up over the flame.  You can use tongs or a pliers to hold the spoon to prevent getting burned.  My directions said to hold it an inch or more above the flame but it takes FOREVER that way!  So I brought the spoon down really low and close to the flame.  Once it starts to melt and curl - it goes very fast.  The plastic will harden very quickly once you take it away from the heat source.  Then, crack off the handle about an inch or less from the bowl of the spoon.  
My directions said to heat the handle-stump, get it all soft, and then stick the petals of the flower together that way.  I found that the petals didn't hold together very well using that method.  So I ended up using hot glue to put them all together and shape my flower.

Remember?  I said it looked really ugly!
Just keep building until it looks the way you want it to.  You should use a kleenex to wipe off all excess carbon from the candle so the paint will adhere.  Then comes the fun part - you spray paint it with your chosen color!  And all of a sudden it looks great!

Let it dry completely and then hot glue it onto the vase.


I tried it with flowers from my garden, but I think they compete with the flower on the vase.  It would look really nice with a compact green plant, moss, or if I had a small-necked vase I'd put in a single stem.
This was my trial run to work out the kinks.  I have a craft day coming up with some friends and will post the pictures we take that day.  No two flowers are ever alike so it'll be fun to see what each person comes up with. 

 It's a perfect no-fail project!


Friday, August 3, 2012

GET LOST IN YOUR PASSION

Do you have some activity that you enjoy where the time just evaporates when you're involved in it?  Like when you're reading a really good book . . . and you get so involved . . . and you look up at the clock . . . and it's time to make dinner?  

Well, I have several things that make time go by in a snap - one of those is my new-found love of exploring with oil paints.   Time just dissolves once I get started.  

So I'm just going to share a few pictures of what I'm working on and that's it for today.

It all started with this beautiful book that I picked up recently, called The Comforts of Home.  The cover of the book really caught my eye because I love pink.  And, a pink sofa!  

Beautiful.  

(The inside of the book is beautiful too, with lots of great ideas.  FYI.)

But back to the sofa.  What I would REALLY like is to have that sofa in my pink living room.  But that's not going to happen so I thought I'd try painting it so it could at least hang on the wall in that room.  I have a long way to go but here is my work so far . . .

I'm practicing my color mixing, and looking for the light, dark, and shadows.  I'm working from the bottom up.  As you can see, if you compare the shadow under the couch on the book cover to my painting, I need to go a lot darker to get that contrast.  
If you paint, then you know exactly what I'm talking about.  It's so fun and addicting.

I'll tell you just how addicting it is.  It's SO addicting that I actually FORGOT my lesson with Norma yesterday.  I have NEVER done that and I feel really bad about it!  Not only for Norma, but for my sweet instructor who wondered where I was.

I'd better use one of these from now on . . .


I'd love to hear from any of you with helpful hints from your oil painting experiences . . .


Wednesday, August 1, 2012

A ROOM, A SHEEP, AND A PAINTING GOAL

I had a fun, busy day yesterday. Stayed home, turned off the AC, turned on a fan, and camped out in my little workroom.  Today's post is about three things that transpired - I'll go light on the words and just share pictures   

#1
A ROOM 
I started out the day by cleaning my workroom.  
(There's nothing like cleaning out your work space to make you feel industrious.) 


Miss Gillyflower and friends nearby as a reminder to get going on that . . .

Along with a great little bit of wisdom!
Some stuffed versions of the characters as a model . . .


#2
A SHEEP
I worked on a close-up painting of a sheep using a photo for inspiration.


#3
A PAINTING GOAL

Then, as a result of the Daily Paintworks Challenge I blogged about a few days ago,  I decided to join the DAILY PAINTWORKS group in September.  (My sheep painting will fit in the Up Close Animal category.)  
So, when a lot of my friends head back to the classroom in a few weeks, I'll try to add in some time spent painting every day.  There is a small fee to join but it's a place to be seen, get inspiration, and sell.    And you can join for a month or forever!  Kind of like Etsy but with a focus completely on painting.  

There are two main reasons I want to join this group:  

1.  It will challenge me to paint things I wouldn't normally paint.
2.  It will make me step out of my comfort zone and focus on using oils rather than acrylics.  It isn't that you must use oil paints, but most of the artists do.  So, you know, peer pressure and all . . .


LinkWithin

Related Posts Plugin for WordPress, Blogger...