Showing posts with label decorative painting. Show all posts

Tuesday, July 12, 2011

TRUMEAU MIRROR

"I'm glad I took a before picture of this project - I just wish I'd used my camera instead of my phone!  But at least you can get an idea of what it looked like "before".  This is a mirror I found at Goodwill, and by their standards, this was expensive!!!  I believe I paid $9.99 for it.  It is very heavy and solid wood.  
 I had seen a Trumeau Mirror on the Graphics Fairy a few weeks ago.  Before that, I had never heard of them.  I love to know the history behind the things I make, so I looked them up and here's what I found: 
"The trumeau mirror originated in France during the 18th century and are as popular today as they were then.  Trumeau mirrors were intended to hang on the wall between windows providing a decorative element to the wall as well as serve a purpose of bringing in more light.  Most antique trumeau mirrors are found painted, as the style of most homes during the 18th century homes were painted in rich faux work with ornate plaster frieze that ornamented the walls.
The trumeau mirror is quite easy to identify, as it is most often rectangular in design. The size of the mirror was dependant on the size of the mantle or the width of the wall on which the trumeau hung.  Trumeau mirrors are designed where the bottom portion is the mirror itself, while the top is generally decorative.   The lower portion of a trumeau is always a mirror, and placed behind a candle and served the purpose of bringing in more light in dimly lit homes.  Homes were not wired for electricity, so any way of bringing in light which extended the hours of  daylight was a necessity.  The upper portion of a trumeau contains a relief carved design, a painting, or a second mirror."
So here is the top portion of my mirror.  No decorative plaster, but still, an area just waiting for some decorative painting.  I planned on adding some gold to the mirror and that little decorative strip below the blank portion looked perfect for that.  So, back to the Graphics Fairy to find a design and I found this, a black and white printer's image.  I was only able to use a portion of the graphic due to the size of the space I had to work with.  Also, I took the wings off the cherubs.  I used the "pencil lead on the back of the paper" method!  
 Then I used some of this metallic finish on a decorative piece of wood that runs below the design and on some of the other raised areas on the mirror.
 There are a lot of metallic finishes out there - this one just goes on with a brush or rag.  
It's keeping my Santos Cage Doll company in the dining room!

-Nan


Sharing this at BRAG MONDAY on The Graphics Fairy
and
Tuesday's Treasures

Tuesday, July 5, 2011

REFRESHING A TIRED TABLE ON THE PATIO

If you get enough of this . . . 
 . . . eventually you end up with this!   
There she is - off behind the shrubs . . . "weathering"!
This poor table sits outside all year round and that's a strain on anything in Wisconsin!  My husband and I made this table from 2 x 4's, pine planks, and some 4 x 4 lumber about 10 years ago.  I made the bench, cutting one side into scrolly scallops to make it a little more interesting.  It's all been painted several times and it was due for an overhaul.  First I sanded it down a bit to get the paint chips off.  The far left portion of the photo shows the condition it was in.  

Not good.   

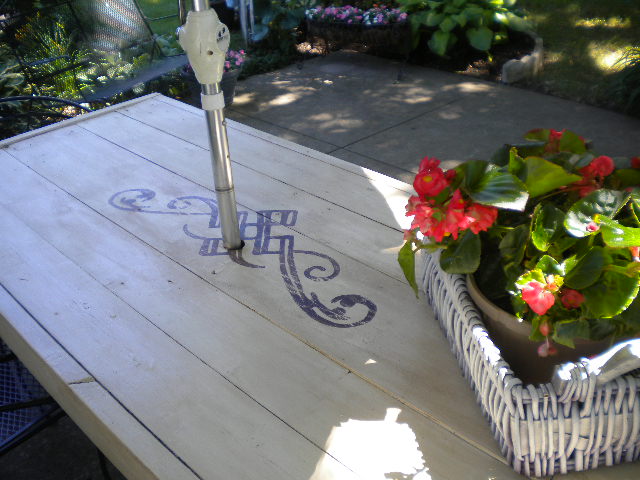
Then, after I read that Annie Sloan's Chalk Paint could be used outdoors, I used my brand new can of Old White to paint the top of the table.  One coat was enough for most of it, while the areas of stubborn black got a second coat.  It dried almost instantly which is good because I am NOT a patient person!  Then, after enlarging an "ornamental doodad" I found on the Graphics Fairy here, I taped it together and traced it onto the table top.  I didn't want a huge, distracting design - just enough to break up the monotony of an all white table.  I painted the design in dark brown acrylic and then as soon as it was dry, I lightly sanded and applied Minwax dark finishing wax to the whole top. 

 The legs and bench got a coat of exterior brown latex (thank you Bobby)!   I think the wax is going to hold up beautifully.  We had dinner on the table last night and any water condensation on the glasses beaded right up!
DSCN4173.JPG


So, you could go from this . . .

to this . . .
in just a couple hours, with a little paint, and a great design from the Graphics Fairy.  It's a quick and easy way to get a patio face lift, and around here we need "quick" because the snow will be flying in no time!
HELLO SUMMER!


Linking to 
Furniture Feature Friday
on Miss Mustard Seed
and 
Primitive and Proper
and
TIME TRAVEL THURSDAY
AT THE BRAMBLEBERRY COTTAGE

Tuesday, May 17, 2011

The desk . . . personalized.

I went out on a limb on this one.  I wish I had a "before" picture of the desk, but I forgot to take one.  But it was just a plain, white, six-drawer desk that we actually rescued from the curb.  For years it's been a great place to sew - plenty of drawers for sewing supplies and the perfect height.  But I have a different sewing table now and so the desk is going in one of the guest rooms.  You can see the first part of this project here.
So.  
Here's how it looked with the Graphics Fairy frame traced on and my French sentence in the middle saying, 
"Welcome to our Lovely Guest".
And, here it is painted on.  
But it looked too new.   
Too crisp.
The edges were too sharp.

So I scuffed it up a bit - the whole desk - and put on a coat of wax.  The drawers are painted a color called Moth Gray by Behr.  I used a dark wax, so it changed the color quite a bit.  
 This is a stretch for me and I'm going
 to have to live with it a bit to be sure . . .


 I would welcome any suggestions, opinions, or constructive criticism.

Sharing this on:
The DIY Show Off

and Funky Junk's
Saturday Night Special
and
Brag Monday at The Graphics Fairy,
 Furniture Feature Friday 
Frugalicious Friday
Transformation Thursday at The Shabby Chic Cottage

LinkWithin

Related Posts Plugin for WordPress, Blogger...