Tuesday, November 30, 2010

Makings of a fun day!

Last weekend when we went down to Chicago, we brought
four of my paintings along.  We took a chance that maybe 
Beth Harlow, of "The Painted Lady",
would see them as a fit for her shop.  Well, she DID
and now it's so exciting to know that my paintings are 
hanging on the walls of "The Painted Lady" in Chicago!
Here are the paintings that went along with us . . .

Icelandic Blue Poppy

Three Pears

Still Life After Cezanne

Coral and Cream
SOLD!
at
The Painted Lady-Chicago


Monday, November 29, 2010

Angel statues in the cemetery

My husband, Bob, is fascinated by old cemeteries.
He loves to walk through them
and think about the people who are buried there.
Sometimes he knows them and sometimes he doesn't,
but it doesn't matter.  We can't drive by one without him
saying, "I just love an old cemetery!" He always admires the huge angel
statues that grace many of the graves in the older cemeteries.  

It won't be a secret once he reads this post, 
but he's getting one of those statues for Christmas.
 This blog is about making things, but I can't actually make the statue
(not yet anyway - I may need to figure that out someday . . .)
However, I can give him the angel in a different form!
So, I began sketching some of them . . .

photo.JPG


photo.JPG

But, I think the statue he would REALLY like is this one that
is an icon in Savannah, Georgia.
She's not an angel, but she is very mysterious!

The Bird Girl


Now to get her sketched, matted, and framed
 . . .  
Merry Christmas, Bobby!

Saturday, November 27, 2010

The Painted Lady on Damen

      We made a second trip to one of our new favorite shops on Friday -
The Painted Lady on Damen, in Chicago.
Such a pretty little shop that I first learned about while reading
the November/December issue of
"Where Women Create".
(This is a really inspirational "book" showing work spaces of some
very creative women.)

The Painted Lady on Damen is owned by Beth Harlow,
who shares my philosophy about old (and sometimes new) wood furniture -
just paint it white!
It's a beautiful little shop filled with unique accessories,
antique furniture, and gorgeous chandeliers.

This place just makes me want to go home and
MAKE STUFF!


Love these light fixtures and thinking about how I could make them . . . 


This beautiful chair was there a few weeks ago . . . but now it's gone.
So, that's more than enough inspiration for one weekend.
I now have about 3 more projects added to my list . . .


Thursday, November 25, 2010

Make a paper wreath for a friend


    I love being surrounded by books, so why not add 
book PAGES to a wall in my home?
                         I saw the beautiful paper wreath below:                                  


Directions for making it are on this blog
I decided that along with making one for myself, 
it would be a perfect gift for a friend 
who also loves books.  A lot of people fall into
that category . . . so . . . look out.
(You know who you are!)

So here's my version - a little smaller than
I would have liked.  Next time I'll make it
bigger by using a larger book.

It's trickier than I thought it would be.
I'm glad I am practicing on myself first!
   

Sunday, November 21, 2010

Make a beautifully textured pillow

This one could be a bit time-consuming but I really
love all the texture and muted color.
Maybe half this size as a ring bearer's pillow?
This will go on my to-do list . . . done in different shades of cream.


by Ronel Jordaan - $345

SAVINGS - $325


Love these chairs!


I love the look of these Horchow chairs . . .
but not the price . . . $2,400 and $1,800!

                            Old Hickory Tannery "Marla" Chair 

                             French Laundry Home "La Jolla" Chair


But! I was walking around Goodwill the other day and saw a real
diamond in the rough.
The sold sign was torn off -
someone had already seen the potential.
However, that customer had changed their mind
and left the store. So, I paid my $9.99 and
took it to the car.

So, here it is . . . in the rough!  It looks so sad right now, but I'm really excited to
give this chair its complete makeover!  It has great bones and they're about to show!

Stay tuned!

This project is linked with Saturday Soiree at A Little Lovely.


Friday, November 19, 2010

Horchow again!

While driving through my neighborhood I noticed
a rummage sale that looked like it had some interesting things -
so I pulled in.
Here was a little "cupboard" type thing
that was stained dark brown.
They were asking only $12!
I painted it "Lambs Wool" (Behr)
- a creamy white that is my favorite.
And that was that - done! It stayed that way
for quite a while.


Then, just recently, I was looking through my new Horchow catalog and
saw these beautiful turquoise pieces, one with a crackle finish
and some hand painted details. Beautiful!

"Monique" Chest

Hand-Painted Wood Cabinet

I had heard that
you can use Elmer's Glue to create a nice
crackle finish. I knew it would be a terrible mess
if it didn't work, but I decided to give it a try.
Here's how I did it:

1. Paint a base color - I used tan. (let it dry)
2. "Paint" on a thick, globby coat of plain old Elmer's Glue (let it dry just until a little tacky)
3. Next, paint it with your favorite color (I used "Birch Forest")
4. Now, be patient and wait for it to crackle as it begins to dry.


It was amazing! As it dried, the crackle finish started to become more and more
apparent! The final finish was exactly what I'd been hoping for!

SAVINGS - $560.00


This project is linked up with
The Power of Paint @ Domestically Speaking
and
Miss Mustard Seed's Furniture Feature Friday


MAKE A FELTED ROSE AND NEST TOPPED PILLOW


The work of Ronel Jordaan, a textile designer from South Africa,
is so unique and beautiful.
But her pillows are soooo expensive (almost $200)!


So, I set out with my best friend and crafting companion, to
try to design our own "Ronel Jordaan style" pillow! We had as much fun
rounding up the supplies (off to Goodwill for 100% wool sweaters that we brought
home to wash and "felt") as we did making the pillow tops.

Just look for 100% wool in the colors you love, wash them in
hot water, and throw them in the dryer. Then cut them up as needed.


Then choose your colors of wool roving, purchase your felting needle tool (Joann Fabrics),
and you're ready to begin!


Using a felting tool, punch in a winding vine of wool roving onto a rectangle of felted wool.  Cut out some leaves from another color of felted wool.  We washed and dried some old wool sweaters to use for the roses and nest on the pillow.  Just cut out a circle from the wool, then cut it into a spiral.  Starting on the outside of the spiral, roll your felt around and around making a beautiful, textured rose.
We LOVE our finished products - our own version of a
textured, felted wool pillow top!


SAVINGS - $175
Frugal at its best!


I linked up with Saturday Soiree at A Little Lovely, Freckled Laundry, and Frugal Friday over at The Shabby Nest, for this one!


Grain Sack Side Chair


This post is entered in Miss Mustard Seed's Copy Me Challenge.

Copy Me 
Challenge


  These grain sack covered chairs are everywhere.  Every decorating magazine and blog I come across has used the grain sacks in different and creative ways. Using them as upholstery material to cover a chair is one of my favorites.


Since I didn't have access to any authentic old grain sacks, I had to try to copy one.  
First, I saw this pretty needlepointed chair in a resale
shop for $45 - it has beautiful carving and lines.

I'm sure someone spent many hours doing
this painstaking work, but it was old and
very dirty.  It had seen its day. 

The details in the wood are beautiful.

But, it's time for a change . . .


Before . . .
and after!

With a little white paint, a stencil, and some natural linen to recover the seat and back, the chair has been revamped to look a little more up to date.  

Linked up with:

and

grabtt


(Someday, when I come upon a REAL grain sack, I'll redo the chair.
But for now, it's close enough to the real thing for me!)

Another Horchow piece!


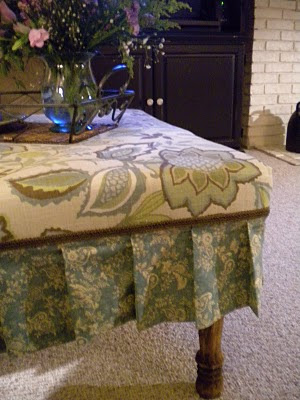
Okay, for a mere $979 you can own this beautiful bench
from Horchow . . . or . . . make a similar one yourself for $50!

Benches


All you need is:
-4 table legs from Lowes in the height of your choice
-a piece of plywood
-some upholstery foam
-quilt batting
-your favorite fabric
-some decorative trim

First, stain/paint, and attach the legs to the bottom of the plywood.  There are some square, metal stabilizers you can get at Lowe's or Home Depot that you attach in the desired spot in the corners.  Then you just screw in the legs to the center of the metal stabilizer.  These keep the bench from being wobbly.

Next, you layer everything like a sandwich!  With the plywood base on the bottom, lay the upholstery foam on top, then wrap it with some nice, thick quilt batting using a staple gun to attach it to the bottom of the plywood.  Make nice padded corners so your bench won't be sharp and hard on the corners.  Then put your fabric on top of the batting and staple that underneath the bench also.  Finally, add your ruffle or pleated skirt with the staple gun, and hot glue on some decorative braid over the seam between skirt and topping fabric.  That's it!  You're done!

The end product is not only sturdy and strong - it makes a great footrest,
coffee table, and extra seating - all in one!


SAVINGS - $939.00


I've linked up with Funky Junk Interiors' Saturday Nite Special.

I was featured on "Fabric Fun Thursday" on January 12th.  Here is her post:


Do you want to save $939?!  Nan, at You Could Make That, uses a Horchow bench as inspiration and shows us how we really can make the above bench and save hundreds of dollars.


Make a sketch-copy of a famous nude


Thought it would be . . . interesting . . . to try
sketching a nude, Rembrandt style. I think they're beautiful,
but then, what would you do with it?
I wouldn't feel comfortable putting this on the
living room wall, but . . .
the bathroom would be a good place!


So I gave it a try.
Rembrandt's model has a hunched, older, and kind of sad look about her.
(Or, like summer is coming and she just tried on her swimsuit)
I decided to take a few years off
and straighten her up a bit!


And there she sits!

SAVINGS - PRICELESS!!!!


LinkWithin

Related Posts Plugin for WordPress, Blogger...