Pages

Saturday, April 21, 2012

SQUIRREL STEW

Bad news.

Remember our beautiful first egg?
 Then our second?
And the third?
Then, this afternoon there were four beautiful blue eggs.  
We went out for coffee and when we returned, I checked the nest to see if there was a fifth egg.

But instead we found this.

Mass murder.  
So sad.

Exhibit A.
Exhibit B.

The only thing that makes me feel better is the fact that they weren't little hatched babies yet.  So they didn't have to suffer.  But the mom is probably pretty stressed out.  We're thinking she might possibly have a fifth egg and may risk coming back to the nest for one last try.

But chances are, she's done.  

And even if she isn't she probably doesn't want to go back to the scene of the crime.  

I don't blame her.  

I wouldn't either.

Special thanks to TracyMB at Crow's Feet Chic for the "revenge recipes".  

(It's actually pretty gross, and I could never do it, but it makes me feel better to threaten it!)

And . . . we're pretty sure we saw a squirrel in the yard with "egg on his face".

This is what he deserves.
(It's really pretty disgusting.  I would advise you not to read it.)

SQUIRREL STEW

3 squirrels, cleaned and cut up
1/4 cup all purpose flour
1 tsp. salt
1/2 tsp. pepper
2 slices bacon
2 T butter
5 c water
1 - 28 oz. can whole tomatoes
1 chopped onion
1 heaping T of brown sugar
2 potatoes cut in cubes
1-10 oz. pkg frozen lima beans
1 c frozen corn
3 T flour

Combine 1/4 c. flour, salt and pepper.  Coat the squirrel pieces.

In a Dutch oven, combine bcon and butter over medium heat until butter melts.  Add squirrel and brown.

Add water, tomatoes, onion and brown sugar and bring to boil.  Reduce heat, cover and simmer for 1 1/2 to 2 hours, stir occasionally.

Remove squirrel pieces and let cool.  Remove meat from bones.

Add meat, potatoes, beans and corn to Dutch oven.  Heat to boiling, reduce heat and cover.  Simmer until potatoes are tender.

Mix 3 T of flour with 3 T of cold water, then stir into stew.  Heat to boiling.

Cook over medium heat, stirring constantly, until thickened, bubbly.

Serve with warm rolls and enjoy!


I wish all of you better luck than we had.  

:-(


THREE EGGS AND THE MOM

There is one more egg in the nest!  Mom has been busy and I'm sure she's hoping for warmer weather around here soon!  She spends a lot of time on the nest keeping those eggs warm and safe from predators . . . like squirrels.  We have a lot of squirrels in our yard all the time, and as I stated yesterday, I'm looking at them a little differently these days.  I always thought squirrels stuck to acorns, but apparently they also have an appetite for Robin eggs and hatchlings.
Here's a close-up of Mama.  I wasn't actually this close to her - I cropped the picture quite a bit so you could get a good close look at her.
 And here's what's going on inside those eggs . . .
So, I'll check tomorrow and see if there's another egg.  She may be done though.  We'll see!


Friday, April 20, 2012

Two Eggs and a Science Lesson

Open the door, put your arm out with the camera in hand, and SNAP!  That's how close this nest is! Since I can so easily see the day to day developments going on in this beautiful little nest, I have to document them!  So, we are now up to two eggs.
 I wondered about the white streaks on the first egg.  After looking around on the internet for a few minutes, I got my answer.  The first egg was definitely moving when it received its pigment.
10 fun facts (and some not so fun) about the American Robin:

1.  Only the mom builds the nest and sits on the eggs.  
                   
2.  The eggs will hatch 14 days after being laid in the nest.  (That puts our birthday party at  May 2nd!)
                   
3.  There should be 3-5 eggs when she's finished.

4.  The eggs will hatch within 2 days of each other.

5.  The male will help with the feeding of the hatchlings. 
                  
6.  The new little robins will be ready to leave the nest 14 days after they hatch.
                   
7.  Mom will dive-bomb any intruders to the nest (cats, birds, or HUMANS!)

                                                                        
and sadly . . .

                   
8.  The American Robins are "super-spreaders" of the West Nile Virus.  
                   
9.  Only 25% of the hatchlings will survive to November.
                 
10.  Robins make great snacks for cats, crows, and SQUIRRELS!  


I had no idea that squirrels ate robins.  

Wish I didn't know that.

I hope I never witness that.

 I used to like squirrels.

:-/


Wednesday, April 18, 2012

ROBIN'S EGG BLUE

Just a little update on the beautiful bit of nature's architecture by our back door.  I was afraid that maybe our mother robin had abandoned the nest since I hadn't seen her for a few days.  Maybe she was taking her last few flights of freedom before she would need to be confined to the nest to keep the eggs warm. 
Regardless, upon checking the nest today I got a picture of the first,
perfect, blue egg and I thought you'd like to see it too!
Beautiful!  Just think of the little baby robin that's developing and growing,
getting ready for its chance at the world inside that egg!


Monday, April 16, 2012

NEST: A PLACE OF REFUGE

Let me begin by saying . . . you CAN'T make this!

In my long days in the garden over the last few weeks, I made a discovery in one of our shrubs.  One day there was nothing and the next day . . .
If I hadn't spent so much time outside these last weeks - it may have gone unnoticed.  It's not very high off the ground, so I hope the leaves fill in quickly and give it cover.  
Those long tendrils of plant material are from the daylilies that were left last fall.  What a work of art!  
Notice that the outside of the nest is made with the more coarse, tough plant parts . . . and the inside is made with the fine and soft grassy like pieces.  A soft little bed for the family to be.
 Today there are no eggs.  But one of these days they will start to appear.  One by one.  

Because she's a busy little mama!

Sunday, April 15, 2012

MEET LLOYD!

I've taken almost 2 weeks off from blogging.  During that time, I've been spending a lot of time in my gardens, enjoying the beautiful weather we've been having.  Spring is finally here!  

Also, during that time, I've been thinking.  Thinking about your wonderful comments and emails.  Thinking about things to make and then, of course, wanting to share them with YOU!  So, I guess I'm going to keep at it but just restrain myself a little more - maybe not posting quite as often.  You all assured me - that's okay!  And so today, I'm coming back with a fun project to share with you.

Do you remember Lloyd?  He is a character from Miss Gillyflower's Adventures.  If you've been following my blog for awhile, you'll remember reading about that - part of my goal list.
His tag describes everything you need to know about him.

Well, meet Lloyd.

In the flesh.
\
He looks pretty serious, but he really did love posing for the camera.
Even showed a little attitude!  He's proud of the fact that he is "baby friendly".  All soft and washable, and nary a button to be found!
He specifically wanted a close-up of his bow-tie!  Why a bow-tie, you ask?  I asked Lloyd that very same question.  His answer?
"It's Sunday!  So, of course I'm wearing my bow-tie!"
So that's Lloyd.  Kind, gentle, helpful, all-around good guy, Lloyd.  
And, one of Miss Gillyflower's dearest friends.  Lloyd is now in the arms of a sweet little one year old named Luke.  

Want a Lloyd of your very own?  
He has arrived in my Etsy Shop, Gillyflower Cottage.
She just may be the next character to "come to life"!


Friday, April 13, 2012

TO BLOG OR NOT TO BLOG?

I now have 492 of you who have chosen to follow along on this little journey and I've had a little internal celebration every time another follower joins my blog!  It is exciting to think I've almost hit 500 followers!  I also have over 750 people who have asked to receive blog updates via email!!!

But.

I haven't posted anything for over a week.  I'm kind of rethinking my priorities and spending a lot of time working in the yard.  I'm just not so sure I want to keep up with the circus of documenting everything I do and make anymore.  Taking the photos, editing the photos, writing the posts etc.  It all takes a lot of time!   I've started to think more about the hours that go into it all and I'm wondering if it's the best use of my time.

During that time I could be reading.  

Or sewing.  

Or making stuff.  

I could be reading a LOT more and making a LOT more because I'd gain all those blogging hours.

So.  Those are my thoughts.  

I've had some really sweet emails from a lot of you lately - thanking me for sharing my projects and instructions and that makes me feel that it HAS been a good use of my time.  I like knowing that I've encouraged so many people to be creative.

But, how long do you blog?  When do you stop?  If nothing else, I've left an 18 month journal for my grandchildren, or great-grandchildren etc.  If they should ever want to, they can learn more about their grandma (or great grandma) by reading a year and a half in the life . . .

Maybe I should just take a nice, long blogging break.

Or, maybe I'm done.

We'll see.  

Whatever happens - in the words of Martha, "It's a good thing!"

:)


Wednesday, April 4, 2012

WIRE BASKET DRAWINGS AND A BIRD SIGN


Okay, the other day, I showed you a wire basket that I made out of a roll of fencing I had out in my garage.
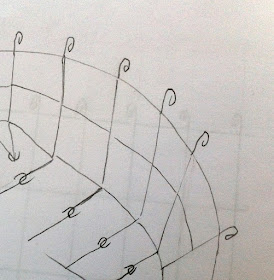
I promised drawings that would show you how it all went together - so I hope this helps.  It's really very easy to make.  The fencing is just awkward to handle and really poke-y - so you might want to wear long sleeves!

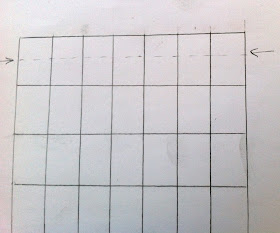
Here's my roll of fencing.  For this basket I just used the top, wider-spaced, portion of the roll.
 Using some sharp wire cutters, snip off a piece of fencing that, once rolled into a circle, will give you the size basket you want.
 Cut off the top row about halfway between the section.  This will leave some straight pieces of wire that can be rolled into the little scrolls at the top of the basket.
 Using a needle-nose pliers, roll each piece of wire into a little scroll.  Then, where I have the arrow, cut  each piece of wire, leaving a piece about an inch long on the end of each row.
As you can see above, you also want to cut off the bottom wires, but leave them long because they will form the bottom of the basket.  You can always trim them down as needed once you get the shape and size of your basket determined.  Then, curl those end pieces into little hooks.
 Bend the piece of fencing into an oval (or whatever shape you're shooting for) and use those little hooks you just made on the side, to join the two ends of the fencing, thus securing your oval.
Last of all, bend each of the bottom spokey pieces to the inside/center of the basket . . .
Make more little hooks with each "spoke" and hook them together to form the bottom of the basket.
Then, if you could follow all this, you're done!!!

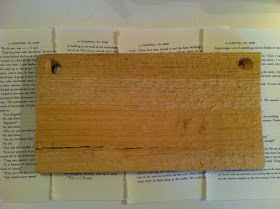
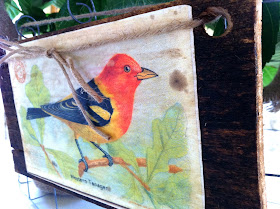
To finish off my basket, I made a little bird plaque with a great old advertising graphic from the Graphics Fairy. I cut a little section of some old cedar fencing and stained it.
 Then just used Elmers Glue under and over the graphic - and added a little stain here and there.
 I tied it on to one side of my wire basket with a little piece of jute.  It's totally removable so I can change it with the seasons or for a specific holiday.
 Feel free to email me with questions if my drawings are just impossible!  

Good luck! 

 I'd love to see your finished products so send them along with an email and I'll add them to my post!

Sharing on:
Savvy Southern Style
Metamorphosis Monday
Somewhat Simple