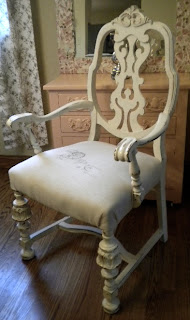
Here's how I went from:
for only $4.95!
The chair project from yesterday is finally done. A few notes . . .
I used a hot, dry iron for the Paris postmark from the Graphics Fairy. Just as the video says, you can't over-iron. If you have to tug at all to lift the transfer paper off the fabric, iron some more!
When it's transferred, it easily peels off. But, you see the transfer paper around the letters? :(
I found that after washing and drying the fabric, the excess transfer paper dissolved a little more. At least it isn't shiny - that's the good thing! And maybe after enough people sit in the chair, it'll blend in even more!
There she sits, stripped down to her underwear! And then the fun part - painting and distressing.
From this . . .
to this!
Now, here's what I did and some comments on what I should have done!
What I did: I printed out the graphics fairy Paris postmark onto Transfer Artist Paper (TAP) and cut loosely around the design, then ironed it on. It transferred very quickly! I bet I only ironed with a hot, dry iron for about 10 seconds and it was transferred!
What I should have done: I should have cut as close as possible to the graphic printout before ironing it on the linen. It looks fine and I bet I'm the only one who could tell the difference, but the little bit of transfer paper I left around the design didn't completely disappear. So, take the time to really cut it closely.
and
What I did: I took the chair into the garage and went full blast with my palm sander. I mean, full blast!
What I should have done: Maybe start out with a piece of sandpaper in my hand and take it slow and easy. It doesn't look too distressed in the photo, but in real life . . . it's pretty distressed. You can always take more off . . . So, I ended up retouching the REALLY distressed areas with a little paint.
But, it's done and I really do like it . . . but it's kind of like going to someone's house for dinner. It always tastes better when someone else cooks. Well, if I saw this chair in a store I'd REALLY love it, but I know where all the little glitches are . . .
-Nan
Sharing this at:
Brambleberry Cottage
Graphics Fairy
Creative Blogger's Party
-Nan
Sharing this at:
Brambleberry Cottage
Graphics Fairy
Creative Blogger's Party


Looks pretty good. have you ever purchased the images on etsy? they recommend the avery and I think that its awful! It looks like something is stuck all over your fabric. I want to try the citri solv as that seems to look pretty good. the printer technique seems good but you're limited to the size of a sheet of printer paper!!!
ReplyDeleteNancy
I agree Nancy - next time I'll use the CitraSolv. I've used it before and it takes some elbow grease but I like the results better. For the cost of "TAP", it should work like a dream! Thanks for looking! -Nan
ReplyDeleteI was anxious to see how it worked. Shoot I wished you could not see the out line, but it looks gorgeous!! Thank you for giving us all of the ins and outs of the project!
ReplyDeleteCarol
Wow! Such a great idea and the finished chair is lovely.
ReplyDelete~ ~Ahrisha~ ~
Wow! What a great makeover! I love the image you chose for the fabric too! Coming over from Brag Monday and a happy new follower!
ReplyDeleteJeanine
Love it! Thanks for sharing.
ReplyDeleteI love it! It would be so wonderful to figure out how to transfer to bigger fabric would it not? I love all of your posts?
ReplyDeleteI am a former cheeshead myself now transplanted to the East Coast.
Do share your secret of where you found such a great bargain?
Oooh, la, la! Your chair is amazing, and I would hardly know that it's the same piece of furniture! One of these days I need to get brave and attempt to use the image transfer paper. Thanks for the great tips!!
ReplyDeleteNice post! I like your blog layout - great renewal and revival of the chair.
ReplyDeleteWhat a great looking chair. That piece really had good bones. I like the transfer--I recently did the same thing and it does have it's learning curve.
ReplyDeleteGreat chair, and even better job reviving her.
ReplyDeleteKristy @ 4 the love of WOOD
The chair turned out very nice. That method of transfer gives a good image, but, like you; it would be much better if the paper around the image did not show. Thanks for sharing what to do and what not to do.
ReplyDeleteBlessings,
Audrey Z. @ Timeless Treasures