Pages

Saturday, October 29, 2011

HOMEMADE PIN CUSHION FAVORS

I have a group of friends I've been with for almost 30 years now.  There are six of us and we get together many times during the year, but formally, we meet six times because celebrating our birthdays is an important part of our friendship.  Once each year, each person gives a birthday luncheon for someone in the group.  Along with a nice luncheon, we always have a favor at each place.  It can be anything from a special candle to a small dish of candy.  Well, this month it was my turn - my favor for the girls was a little . . . different.  Not something you'd usually see at a place setting.  But that's okay - these women are good sports and you can pretty much do whatever you want to and they'll ohhh, and ahhhh, and love it anyway!  So here are some photos from that day . . .
 Burlap on the table, of course!  My centerpiece was made of three tin buckets with a branch from my crab apple tree in each one.
Each place had a kind of "pin cushion sundae" for a favor.  Then I made a "hat pin" to go in each one, just to dress it up a bit.  For the hat pin, all you have to do is take a piece of heavy gauge picture hanging wire (about 7 inches), twist a little loop on one end, and thread on some leftover beads.  Before you put on your last bead, put a little dab of hot glue on the wire and then quickly slip on the last bead.  That's it!  You can sharpen the end of the wire with a file if you like, but these easily went into the pin cushion just as they were.  The pin cushion itself went together as follows:
Cut a circle of any fabric - about twice the size of the opening of your dish.

Run some stitches around the perimeter of the circle and cinch, but not real tight yet.
 Stuff the pouch firmly with fiberfill and then cinch it tightly.
Run a line of hot glue on the inside of the dish, right up near the top.  Then quickly pop the stuffed round of fabric into the dish, cinched end down.  
 
They were probably the most unusual favors we've ever had at our lunch tables through the years - you don't normally think of putting pins near food!  But they looked pretty - kind of like dishes of ice cream!  And with colder weather just around the corner, I know I tend to do more sewing and needlework.  So, hopefully they'll come in handy.  Nevertheless, they were fun to make and give as a reminder of the day!

Linked to:
Between Naps On The Porch

Thursday, October 27, 2011

A KITCHEN SIGN

 A few weeks ago I took some photos while visiting the shop, My Favorite Room, in Mckinney, Texas.  I was just looking through those photos again and this old box caught my eye - especially the label.  I decided to do a little research on what this box held - back in the day.  Kitchen tools?  Menu ideas?  Recipes?
After googling it, I found that this box was sold around 1940 . . . for $1!!!!!  How can that be?  One dollar???  I can't imagine a time when you could buy something like this for $1!  What was shipping and handling - 5 cents?
It was a recipe box, "professional-style", so it says!
     
It was meant to be filled with recipes that were published in this magazine . . .
 . . . back when you could get 3 magazine subscriptions for $2.00!!!
I decided I'd like to have a sign in my kitchen as a reminder of those days.  I don't know about you . . . but except for a few old favorites, I get most of my recipes off the internet these days.  This is a great reminder of the way things used to be.  So I worked out the label on my word processing program.
  I wanted to get it as close to the original label as possible.

Now to print it, transfer it, paint it, and post it!  Results coming soon . . .


(If you're interested in printing out and painting this label too, just send me an email and I'll forward the document to you.)


RECIPE FOR A HALLOWEEN MANTEL

Today,  I'm going to show you  how to put together a Halloween mantel for about $13 (Perfect number for the occasion!) with Goodwill finds and things I found around the house and garden.
 Start with an old frame from Goodwill.  You need a focal point for the mantel, and this frame is going to be perfect.  I have an old Halloween verse I'm going to put on the inside.  So, take it apart, and instead of spending more money on a piece of black mat board, just paint the board with black acrylic paint.  Cost - $6.99
I started out just painting inside the mat board, but then decided to paint the whole thing.  The paint looks shiny and streaked here, but it's wet.  When it dries, it's perfectly flat with no streaks!
The poem I used in this framed piece is from an old-fashioned postcard at the Graphics Fairy.  I printed it out on 8 1/2" x 11" printer paper, took it to Office Max, and had it enlarged to 18" x 24".  Then, I just burned the edges all around, with a few added scorch marks here and there to make it look old and creepy.  Cost -  $ .99
 Here's a close up of the poem from the Graphics Fairy.  I used a font called The King and Queen.  You can download it free of charge on dafont.com.
Add an old, rusty antique lunch box . . .  Cost - $0 (it was in my basement)
  . . . some seed pods from your garden (these are cone flowers) in a glass vase.  I spray painted the inside with flat, white paint.  Cost for the vase and flat white spray paint - $ 3.99
This little bottle also came from Goodwill.  Print out a little poison label from the Graphics Fairy, glue it on, and then stain it with some Old English Scratch Cover.  Before it dries completely, tear away the label a little bit here and there, so the jar looks old and used!  Fill it with some water that's been mixed with a tiny bit of brown and green paint.  Cost - $ .49
Add another jar with a huge tarantula glued to the front.  You could even have some spiders crawling out of the top of the jar - artificial, of course!  This jar was also painted on the inside.  The spider is from the Graphics Fairy.  Jar cost - $1.99
An old, ornate candle stick is topped with a pillar candle that has been painted black for the occasion.
Put it all together and you have a perfectly creepy mantel for October!
This post wouldn't be complete without a photo taken from a scary angle with the candles aglow!
_______________________________

 So . . . let your silver candlesticks tarnish, buy or paint some black candles, and scour your local thrift shop or your basement for some old tin or wood boxes that look like they could hold some eerie ingredients.  Use your imagination!  Then add some bottles and jars, an old frame, and a fun Halloween verse.  Next, take a walk through the garden and look for interesting seed pods to put into those old jars or vases.  Remember to plan your pieces with your wall color in mind.  The bricks above my fireplace are off white, so candles etc. needed to be black so they would contrast.  Little by little, you can put together a Halloween mantel for next to nothing!


Saturday, October 22, 2011

RIDE FOR THE ROSES

Last winter I posted about my son's battle with testicular cancer.  Andy is an avid cyclist and so he focused on raising money for the Livestrong Foundation as he went through chemotherapy.  In the end, he raised almost $34,000 for cancer research! 

Well, last weekend was the culmination of all his efforts.  First and foremost, he is now cancer-free!  To celebrate that fact we traveled to Austin, Texas to watch him take part in the Ride For The Roses with Lance Armstrong.  Andy had the second highest fund-raising total, and this earned him a private ride with Lance, along with dinner at Lance Armstrong's home in Austin where Andy was a guest speaker. Here are some photos from that inspiring - and emotional - weekend!
 Andy, ready to ride.
His hard-earned yellow jersey.
Lance Armstrong, ready to ride with the participants.
 It was pretty emotional, seeing Andy "move to the right" 
as he came in to the finish line.
 Andy and his good friend Ryan, after 90 miles 
on the road, greeting his wife, Kate.
These two have endured quite a bit for a young, married couple - so happy for them to be at this side of the battle!

And THAT is our happy ending!


Wednesday, October 19, 2011

"MY FAVORITE ROOM" - TEXTILES

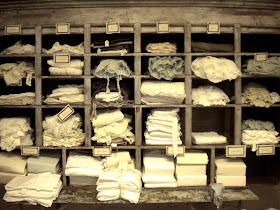
If you saw my post yesterday about My Favorite Room in Mckinney, Texas, then this post needs no introduction.  Here are some more beautiful pieces from that little shop.

And . . . my two favorites below!  
Cheesecloth just might be my new burlap!

MY FAVORITE ROOM - MCKINNEY IN OCTOBER

Last weekend, we had the opportunity to be back in McKinney, Texas.  One of my favorite shops of all time is just off the square in McKinney and it's called My Favorite Room.  I've posted about this shop before and it is amazing.  I think it could also go by the name, "Anthropologie Home"!  I don't know where they get all their beautiful things, but you can count on being treated with the most unusual home furnishings around when you walk through their doors.  This place is inspiring!  They are always so gracious about allowing me to take photos and I took a load of them this time!  Actually, I took so many photos that I'm splitting them into two posts - tomorrow I'll post the textile photos.  Enjoy!  You get to go to McKinney from your easy chair!
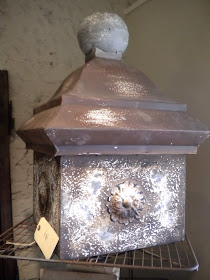
 A home for one really big bird!
An old shoe-shine chair?
 LOVE this chair!  Just look at those rosettes . . .
  . . . and flouncy skirt!
 Love this too . . . AND . . . you could make that!
 So, there you have it!  A photo tour of My Favorite Room in October!  I'll be back in January and I'm sure they'll have all new furnishings to photograph!  I can't wait!