I was just straightening up my beading supplies and got in the mood . . .
Pages
▼
Wednesday, December 29, 2010
Tuesday, December 28, 2010
Make a necklace inspired by Anthropologie
As I was scrolling through the "statement" necklaces on Anthropologie's website,
I saw several I'd like to make. I thought I'd give a combination of these two
necklaces a try - putting the organza flower (shown in peach on the first necklace) in
the spot where the sparkly beads are on the second necklace.
I saw several I'd like to make. I thought I'd give a combination of these two
necklaces a try - putting the organza flower (shown in peach on the first necklace) in
the spot where the sparkly beads are on the second necklace.
 |
| Then, very carefully, hold the circles close to a flame so the edges get sealed off and a little bit curly. Later, we stack them, sew them, and put a few beads in the center. |
 |
| Then we arrange the beads. |
 |
| Slip the beads onto wire, attach the chiffon flowers, add some chain, and then a clasp. |
 |
| Kirsten's necklace |
 |
| and Gwen's . . . |
 |
| and finally, mine! |
One word can describe our jewelry making session today
and that would be . . .
CATHARTIC!
AND, the necklaces are beautiful!!!
 |
| We even had time to enjoy a little treat and coffee when we were done. Thank you for such a fun morning, Kirsten and Gwen! Now, get ready for our next project (shown below)! |
| Anthropologie's Amlapura and Kuta Necklace - $198 We could make this! |
Wednesday, December 22, 2010
Make a Santos Cage Doll
To summarize a description from Santoscagedoll.com:
They were originally started as copies of 17th century carvings by priests. Santos were first created for use as in-home altars. They were needed in small villages that did not have a priest, as well as for when it was not possible to travel to church, such as during times of war. Their development flourished in Europe in the 1700’s and 1800’s, primarily due to these wars. Santos dolls are closely related to the Crèche figures, which were implemented in Italy by St Francis of Assisi, during the 13th century. Santos, particularly the females, exhibit a most loving expression that is also complex and thoughtful. Their shape is often rustic in nature, yet with delicate details. Some dolls are basic and rustic, and others are refined and dainty.
They can be male or female, with or without wings or crowns, but either way I think they're beautiful and have a really interesting, rich history. Here are some of my favorites.


Courtney at French Nest Market, has some beautiful photos of her Santos Cage Dolls.


I have found reproductions for anywhere between $150-$250, and
I saw an original Santos Cage Doll from the late 19th century selling for as high as $3200.
Some people think they are creepy, but if you give them a chance, they grow on you!
I think I could make one and I'd really like to try!
They were originally started as copies of 17th century carvings by priests. Santos were first created for use as in-home altars. They were needed in small villages that did not have a priest, as well as for when it was not possible to travel to church, such as during times of war. Their development flourished in Europe in the 1700’s and 1800’s, primarily due to these wars. Santos dolls are closely related to the Crèche figures, which were implemented in Italy by St Francis of Assisi, during the 13th century. Santos, particularly the females, exhibit a most loving expression that is also complex and thoughtful. Their shape is often rustic in nature, yet with delicate details. Some dolls are basic and rustic, and others are refined and dainty.
They can be male or female, with or without wings or crowns, but either way I think they're beautiful and have a really interesting, rich history. Here are some of my favorites.
Courtney at French Nest Market, has some beautiful photos of her Santos Cage Dolls.


I have found reproductions for anywhere between $150-$250, and
I saw an original Santos Cage Doll from the late 19th century selling for as high as $3200.
Some people think they are creepy, but if you give them a chance, they grow on you!
I think I could make one and I'd really like to try!
Monday, December 20, 2010
Make faux rosewood flowers out of book pages
I found this wreath while looking at another blog - it uses the same technique for making roses that I used on my felted nest pillow. I never thought to use paper in the same way. You can visit the website at the bottom of the photo and learn how to make these.
Looking back, here are some pictures from the day Jan and I
made felted roses for our pillows last winter.
Here is mine. I made a similar "flower" arrangement out of paper for a Christmas gift, in lieu of a bow!
Just remember to roll your roses from the outside of the spiral first. You can watch a pretty good video of how to make the flowers here.
 |
| Brown paper packages tied up with string . . . |
Love anything related to books - this package I am giving to a very special couple!
Sunday, December 19, 2010
Make an owl coin purse
Christen and I are ready to make our Bon Mot Owl Coin Purses.
We have the outer fabric, the lining, the beads, and the purse frames.
 |
The first thing we need to do is design the pattern for our coin purses. We got the directions here. |
 |
| Trying on the purse frame for size . . . |
adjusting, and finally sewing the front and back
together . . . it's time to turn the coin purse "inside out"
and see how it looks!
 |
| Then we glue on the purse frame and . . . |
 |
| Done! |
Also, thanks to Dan, who patiently waited for our project to be complete!
(This was NOT a quick project!)
Savings? Immeasurable for the time spent figuring it all out with my
sweet daughter-in-law, Christen!
Sunday, December 12, 2010
Make Kate Spade's Bon Mot Owl Coin Purses
The write-up says, "A wise way to watch over all of your prettiest pennies." Somehow, spending $95 to store your pennies does NOT seem wise. However, I DO love this little coin purse, and I DID get a great little package from Hong Kong a while ago that will help me out with this project. PLUS . . . my daughter-in-law has agreed to be my partner in crime for this one sometime soon!
| Bon Mot Owl Coin Purse - $95 |
| There's even a Kate Spade Sherwood Owl Handbag for $279 |
| . . . and a Wisdom Owl Necklace from Anthropologie . . . |
Now to decide which one we should make . . .
we're leaning towards the first coin purse.
SAVINGS - at least $90
Saturday, December 11, 2010
Make more soap-in-a-coat for gifting
So, I decided to make some "coated soaps" for the Book Group girls.
Every year we exchange a small gift at our Christmas party - so this will be mine.
 |
 |
| . . . and soap |
I made my own soap using a goat's milk base. Goat's milk base is
unscented - so I decided to use it for my soaps since scent
is a very individual thing. After melting the base, I washed out a
large can and poured it in - then into the fridge to harden.
After removing it, I cut it into the 6 disks you see here.
Next, you wrap it loosely in the wool roving. Put on your rubber
gloves, dunk it in hot water, and start gently rubbing the soap.
It will lather up! Once it's starting to stick together you can rub
more vigorously - that's what causes it to "felt"! When it becomes
felted "fabric" and no longer roving, rinse out the soap, squeeze
the water out, and set it on a clean towel to dry.
 |
| Wrap it up with string and a label . . . |
 |
| and you're done! |
Saturday, December 4, 2010
Make a book-inspired table setting
I found this centerpiece idea a few days ago while wandering around blogs looking for paper wreath instructions. I still can't believe that the website, The Graphics Fairy, really exists! She has a HUGE number of beautiful graphics and they're all free! I'm hosting the Christmas dinner for my book club this year and I need a bibliophilic centerpiece. This would be perfect! I found it on the Cheap Chic Home blog. So, I'm posting it now which means I am committing myself to making it - or at least something close. This weekend, when I actually put it all together, I'll take a picture and post the comparison.

And this arrangement (from Pretties and Posies) for the benches outside the front door . . .

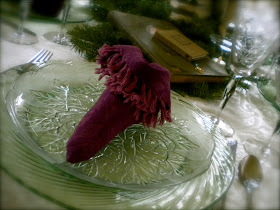
A few years ago I remember folding "Elf Boot" napkins, but I couldn't begin to remember how to
do THAT again without a little help. So, I found the sweetest little old man named Luigi who is kind of an elf himself. In his video, he teaches you how to fold "Elf Boots" and "Cinderella Slippers". Since our book group is all ladies, I decided the Cinderella Slippers would be best.
 |
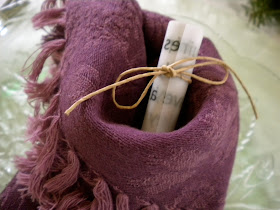
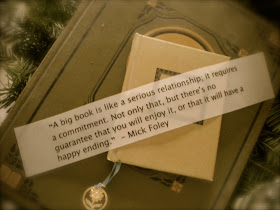
Inside each slipper, is tucked a little elf-size scroll
with a quotation about books, printed on vellum and tied with string.
|
 |
| Love it! |

 |
A little "book page" house, in keeping with the theme.
My friend Jan, from McKinney, Texas, really took off on the "Elf Boot" napkin idea. She made some for the children's table at their family Christmas celebration - complete with candy canes tucked inside. They look adorable! What child wouldn't love to sit down at this table?
 |
| I love it, Jan! This tablescape is linked to: Between Naps on the Porch |


